Monday, January 30, 2012

Organized Resolutions: Weight management

The year in year out resolution that probably most of us have made one time or another {other than organizing}, is to lose weight or at least to get more healthy! Am I right?


I have told  you my weight loss story before. I was never overweight until after I had my first baby. I gained over 70 pounds - most of it was water, seriously - and even though I lost some of the weight, I then gained it back again after having my second baby and gained a total of 80 pounds. By the time I was 36 {and done having kids}, I was a good 40+ pounds overweight and needed to do something.


Friday, January 27, 2012

Curb Appeal Project: The new front entry

Can you believe we've been working on this curb appeal project for several months now? Here is a sneak peak at our paint - which is {basically} DONE!


Isn't this front entry amazing? I realize that some people would FREAK out at having a dark blue house and a yellow front door...but I'm not some people! I have to be honest...photographing the new color of our house has been a challenge! Big challenge - so it looks MUCH more "smurf blue" in photos - but when people come over they say that it looks so much better in person! The name of the color is "Stormy Sea" by Dunn Edwards.


Here is a little then/now photo so you can see what we started with. I never liked the color of the house - well, it was a non-color that I called "yuck"! The front entry I took a picture of this fall to show you what it started like. And now, it looks so warm and inviting! Of course, I got a new doormat, too - rounded to match the round steps and overhang of our front porch. I've got plans for some planters on the front porch...that will be coming soon!


I also have many details of the paint job here. My painter was AMAZING! I am not normally a picky person, especially when it comes to home projects. But, I had many very specific things I wanted to do with the SIX colors he painted on our house. You can see on the front porch there are five of the colors {black, white, gray, blue, yellow}. The stucco goes all the way up and around the overhang but I had him paint white on the ceiling of the overhang to make it seem taller and higher. I had him paint the detail black on the semi-circle overhang to bring it out.


The steps were another detail that I specifically had a vision for. I didn't want the flat color...before they were just painted one color. My vision was to paint it two toned. Notice that the first picture shows the paint before - faded and old - the next picture shows after he used a clear primer to ready it for the gray paint. The third shows the result of what I asked for - an illusion that it's got an overhang/lip with white risers and gray treads.


He carefully measured it and taped it precisely. It looked just like I had imagined in my head...Oh, and some of the many stairs I saw on entries on Pinterest under my House Paint Board. You can also see where I got the idea for these colors! Ok...are YOU a beige house kind of person, or a not-so-beige house person?


Pin It
Photobucket 
 Like what you see here? Consider becoming a follower or subscribe via email!

Follow Me on Pinterest

Having trouble seeing the pictures? Try THIS.

Are you an Organized Reader? I'd love to see your organized space. Email me HERE and show me your space to possibly be featured as one of my Organized Readers.


Wednesday, January 25, 2012

For the love of organizing!

Sometimes I just have to share the times when I find simple organizing so much fun - for the pure love of organizing!


So, this simple and easy tidbit is purely for my own enjoyment - that I hope to spread to you! I bought the above containers at Ikea. It's a pack of six different storage boxes and they come in a flat pack like this.


Pretty neat, huh? I like that they have zippers to zip them up! 


I was inspired when I was at my friend, Nicole's, house and her girls' drawers were full of them. {see above}


OK...so, in my excitement I decided to use them in my daughter's drawers in her closet. Remember this Elfa drawer system?


Well, it works great, but it needed a little tweaking! Her pants look nice when I placed them in the drawer, but as soon as she would take out the one on the bottom {kind of like the shirt dilemma} the stack was a mess! So, here's what I did!


First I took her pants and folded them in thirds. I do this in my own closet drawers and my hubby's closet too. 


But, it didn't work in the storage boxes right. So, I tried folding them in quarters and that way worked just how I imagined it!


Now they are stacked nicely for her to pull out {without messing up the rest of the pants}, and look at all that room left in the drawer!!


I also organized her pajamas and swimsuit drawer - yes, it's a weird combination of clothing in one drawer, but it works for her! Well, that's it for the fun! Hope you are inspired...have you had any fun organizing a drawer lately?

Pin It


Photobucket 
 Like what you see here? Consider becoming a follower or subscribe via email!
Follow Me on Pinterest

Having trouble seeing the pictures? Try THIS.

Are you an Organized Reader? I'd love to see your organized space. Email me HERE and show me your space to possibly be featured as one of my Organized Readers.


Monday, January 23, 2012

Organized Resolutions: Cleaning

Today's organized resolution is cleaning! 
Uggh, this is seriously something I don't like to do. 


Are you like me? Do you NOT want to spend all your time cleaning everything? I certainly don't. About a year and a half ago I shared a post on keeping your house clean by doing 15-20 minutes a day of cleaning. It's a VERY popular post. I have actually had a couple of nasty comments saying that I misled people into believing it's REALLY possible to do it and that it's just not possible - but hey, TWO bad comments out of thousands of hits on that ONE post isn't so bad, right? I've also seen comments on Pinterest about that post that people can't see when I actually do laundry.


Friday, January 20, 2012

Fun project: Magnetic Bulletin Board

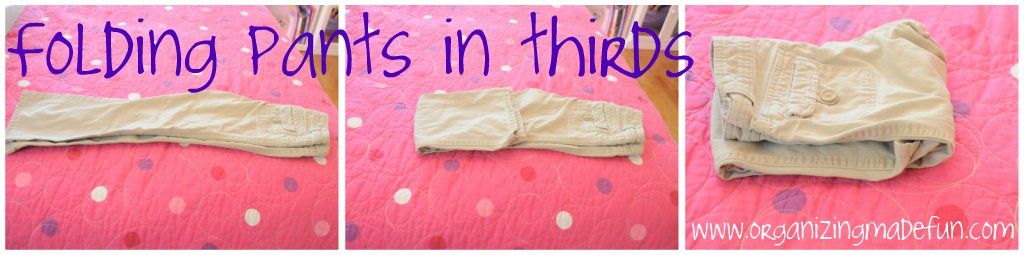
I had to do one small project while the kids were home on Christmas break! It truly was easy - I did it in about half an hour!


It's a magnetic bulletin board. My daughter has a bulletin board behind her door, which is great for her to display whatever she wants. But, the problem came when the pins kept coming out and ending up on the floor - ouch! Or, the pretty scrapbook paper I used got torn and tattered - uggh!


I've made a magnetic art board before AND I cut up some sheet metal to use in my spice cupboard, so I just had to get the last piece of leftovers to make this one.


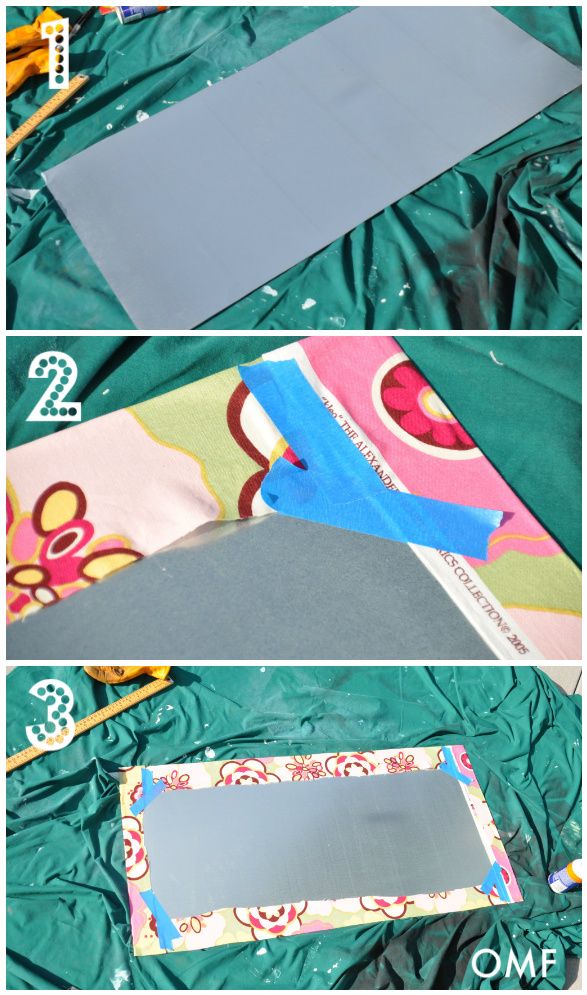
My supplies were: gloves {cause you can seriously cut yourself on that stuff}, sheet metal {found in the roofing department of the hardware store}, a marker, ruler/yardstick, electric sheet metal cutter {you can use a regular one, but these don't cost too much and work WAY faster}. I also needed some pretty fabric, spray adhesive, and some painter's tape. 


I simply cut the sheet metal to the size I needed - which I didn't have much left so I just snipped off the pieces off to make it a rectangle. I wrapped the fabric around it and cut off the excess, then used painter's tape around the edges after I used a little more spray adhesive. It was easy!


Then, I used the Command velcro attachments to adhere it to her wall - which is nice since it doesn't need to be perfect so you can eyeball it {that's my classic way of doing it} into place! Super cute, don't you think?

Pin It
Photobucket 
 Like what you see here? Consider becoming a follower or subscribe via email!


Follow Me on Pinterest


Having trouble seeing the pictures? Try THIS.

Are you an Organized Reader? I'd love to see your organized space. Email me HERE and show me your space to possibly be featured as one of my Organized Readers.


Wednesday, January 18, 2012

Organizing the van

My van is my second home. I spend a lot of time in my van carting kids to and from activities and therapies. So, keeping it organized is of utmost importance to me. Keeping it CLEAN is also important. Today I'm going to share with you how I organize my van and keep it clean {most of the time}.


My van is now over six years old. I don't plan on getting another van/car for many more years {hey, it only has 57,000 miles on it}. Even though I {fake} my immaculate home, I'm pretty picky when it comes to my van - even six years later!


I got this fantastic trunk tray that holds all the necessary items that we need. {You can also see many collapsible ones in my Amazon store, too}. 


It holds the following items:

  • Two {beige} towels
  • One bag full of shopping bags
  • Small tray of kids' items
  • First Aid kit
  • Umbrella


The two towels are there for various reasons. I lay them across the entire back of the van whenever I have plants or messy goods to put back there. I use them to wipe up stuff, which you just never know what might happen. I use them for kids if they get wet or cold. It's really been invaluable to keep them in there - but be sure to keep them clean and put them right back!

The bag full of grocery bags is for my grocery shopping, and quite honestly, useful for many things. My grocery store gives me extra "credit" if I use my own bags. When I finish putting my groceries away, I fold them all back up into the main bag and set right by the front door {or blocking it since I'm very forgetful} so when I head out to my van again, I will put them right back.

The first aid kit has come in very handy. Just nice to have it there for that band-aid need or whatever small emergency might come our way. And the umbrella isn't the best one, but a small one that I use in case of a surprise storm {although here in So. Cal. we don't have a whole lot of those}.


The kids small tray is actually from Ikea. It's the small Trofast storage tray, made for the storage unit. I used a bigger version of this in my daughter's closet, as you may remember. This tray is great because it fits right between the kids' seat and is most useful on long road trips.


The kids' back seat area has a trash "can" that I hung from the hook behind the passenger seat with a luggage strap. There is a magnetic road game in one of the pockets behind the driver's seat. They also have Wet Ones wipes that fit into the cup holders for when we have yucky hands - especially when we go to the recycling center, yuck!}.


In the back, just behind the kids' seats, I also keep water bottles and more Wet Ones. I am the carpool mom once a week, so the back seats are then flipped up to fit more kids. But usually I keep our Blessings Bags behind my daughter's seat, just in case we need to grab one easily.


In the front, where "Momma rules the roost", I actually don't keep a lot of stuff up there. It's like my purse, I just don't NEED a lot of stuff so why keep it in there? The middle console I have a small pad of paper, pen, and some breath mints. Then, under that part is a deeper console {I used to keep DVDs in there} which I put extra batteries, hand sanitizer, and power cords. I have a side panel on the passenger side that the dealership gave us that holds all the owner's manual and another small first aid kit and all my insurance and registration forms. I also keep a pop-up sunshade {for our HOT weather} folded up next to the console.


I also have a van old enough that it was before "Ipods" were popular so my hubby ran this thingy in there that hooks up to my van Ipod in one of the cubbies. The glove compartment doesn't hold much either - a couple of CDs, and extra DVD remote, and some bank envelopes. I have a built-in GPS on my van so I don't need a map or anymore paper stuff like that. I keep another trash "can" on the purse hook {which I don't know who's purse has a strap that short} for our trash. I keep some spare change in case I need it too. And that's it! Now, how do I keep it clean? Let me tell you, I have RULES!


  • No food or drinks {only water} allowed in my van {I make exceptions on long travel or vacation because I get the van washed when I get home}. The kids seriously get giddy that they are allowed to eat in there on vacation!
  • If they MUST eat, because of time constraints, I pick snacks that don't have tons of crumbs or aren't super sticky {i.e., granola bar or rice krispy bar}.
  • Whatever "stuff" the kids bring into my van MUST exit when they get out and go inside the house. If it stays more than a couple of days, Mom will toss it!
  • Rubber mats. We don't live in the snow, but we visit the snow a couple of times a year. I bought two sets of  THICK rubber {all-season} mats years ago. Seriously, my carpet underneath still looks almost new!
  • Place trash "cans" in the back and front seat and empty them every time you get gas in your car/van.
  • If you are able, leather seats are just the best and easiest to keep clean. If you don't have them, try getting seat covers that you can wash. When I had kids in car seats, I bought a seat protector that fit under their car seats. I could easily clean it and keep the seats protected.


So, I'm pretty protective of my van. My kids have been told "it's Mom's van and these are my rules. When you get your own car, you can do what you want." I want it to be clean. I don't like sticky, crumbie messes in my van. I only get it washed maybe once a month {if I'm lucky}. I love that my trunk tray can easily be moved around if I have lot of groceries. It can also be taken out easily and put in the garage if we need to put a big load in the van. I also realize that what I put in my van is different than what you need. When my kids were babies, I kept a small bag of extra diapers, bottles, treats, and clothing {or undies}. Because I've taken good care of it - and required all who enter to do so - it looks great for being six years old. Happy Organizing!


Pin It
Photobucket 

 Like what you see here? Consider becoming a follower or subscribe via email!

Follow Me on Pinterest

Having trouble seeing the pictures? Try THIS.

Are you an Organized Reader? I'd love to see your organized space. Email me HERE and show me your space to possibly be featured as one of my Organized Readers.


Monday, January 16, 2012

Organized Resolutions: Scheduling

Do you have a crazy, busy life? Me, too! 

resolve organize schedule

This Christmas I felt like I was going to go bananas! Every day was filled with activities and more things that needed to get done than I wanted to do. I had an opportunity to speak to a group of college students in their teacher education class on autism - which was so wonderful to do! Plus, I had all the many activities to drive my son to [who is now a middle schooler and his schedule has just exploded}. I had a blog explosion, lots and lots of email and facebook. I had piano lessons to teach to 15 students. I had FOUR Christmas parties at my house. I had regular Christmas activities....well, it was nuts. Absolutely nuts. How did I do it all?


Friday, January 13, 2012

Be a Blessing: Blessings Bags

My daughter has such a merciful heart. She is such a great reminder to me to be kind to those in need, and it breaks her heart. We often see homeless people around, looking for money {of course}. I'm usually alone with the kids in the car when I see them. So, inviting them over to work for money/food isn't really a good idea. Also, it's probably not a good idea to hand them money, so I liked this idea!


I found this idea on Pinterest {but original source is THIS} is making Blessings Bags. This is truly the answer to how we can be a blessing to the homeless without contributing to their possible problem. 


We went to our dollar store to look for the toiletries products. My friend's husband is a Gideon and she is in my Bible Study. I asked her about getting some small New Testament Bibles for our bags and she gladly gave me ten! Yay!


The ideas for the toiletries I got based on the other bags I'd seen on Pinterest and what I could find at the dollar store. They could have these toiletries to feel clean and healthy.


The food is what I had in my pantry that I knew could hold up over time and in a cold/hot van.


The most important part of the "Blessings Bags" are the Bibles and the "Million Dollar Bill" tract. It's not meant to fake them out, but to make them read it and {Lord willing} respond.


I got these "Million Dollar Bill" tracts from Here.  


I found the small covered cardboard box at the dollar store to store everything in. We keep it in the van with three of the five "Blessings Bags" that we made. When we get low, I have two more stored in the basement.


A few things I would advise if you decide to make these. Try and find trial sizes of things when they on sale or specials. If you pay $1 per item, that's gets to be a lot of money. Use food you have on hand {that can tolerate sitting in a car}, if possible. Have an idea of what you want in your bag, but be prepared to change a little if the store doesn't carry everything. If you have the resources, putting a $5 gift card to Starbucks or McDonald's is another great help {no cash}. Be thoughtful...how would you want to be treated? Be a blessing!


Where to buy:

Million Dollar Tracts
Collaspible Box for Car
Ziploc Bags
Gift Cards
Gideon Bibles


Pin It
Photobucket 

Like what you see here? Consider becoming a follower or subscribe via email!

Are you an Organized Reader? I'd love to see your organized space. Email me HERE and show me your space to possibly be featured as one of my Organized Readers.